Getting Started:
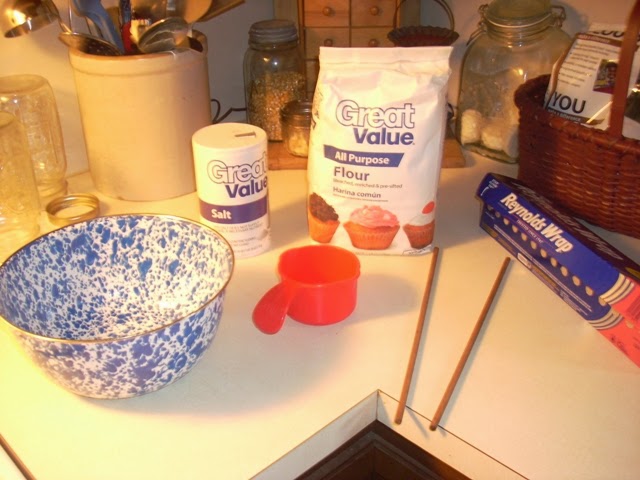
What you will need: I know what you are thinking... why do we need those dowel rods Mary? I also forgot to take a picture of a drinking straw. You will need this too.
Line some baking sheets with your foil. Since this stuff is non-toxic you could just put them directly on the the sheet. The flatter your foil the less "wrinkle" look you will have on the back of your circle.

Salt Dough Recipe I found here. (there are a few more recipes on this webpage :-) )
2 cups flour
1 cup salt
1 cup warm water
Mix the salt and flour together in a bowl. Add half of the water and stir. Add the other half stirring til most of the dry ingredients are mixed in. Sprinkle your counter with a little flour and knead the dough for 5-10 minutes. This IS very important if you want flat circles!!!! As I said at the beginning, I didn't knead the dough very long and the circles puffed up. I don't want puffy. Learn from my mistakes!!!! lol So this second batch I kneaded. I took and separated the dough in half. Roll out half of your dough. This is where your dowel rods come in.

This tip is from Karen N., who emailed me...
When I read your blog today about rolling out the salt dough I just had to share with you something I do to get the dough rolled out evenly. I did this last year when I was rolling out gingerbread dough to make gingerbread men ornaments and it worked like a charm. I just cut two pieces of dowel (I used 1/4 " dowel cause I wanted the dough to be about that thickness so just use whatever size dowel you want) put the dough between the dowels and have the edges of the rolling pin run over the dowel. Presto.....perfectly even dough.
Thanks so much Karen!!!! Now we can all benefit from your wisdom!!!! Now that's a smart lady :-)

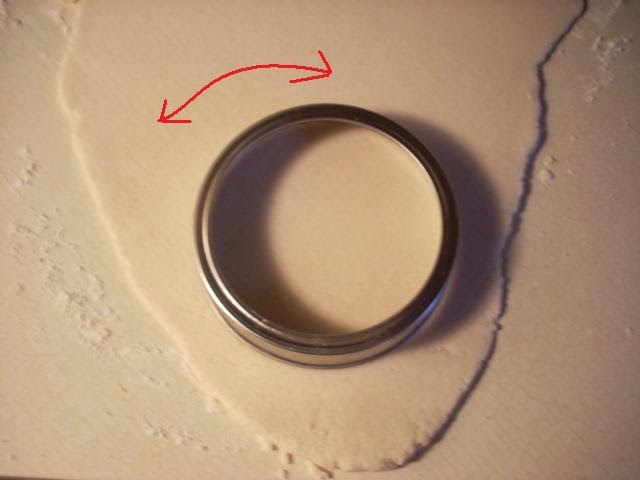
Now for my secret... Do you want perfect sized circles??? Use the lid to a wide mouth ball jar. Put it on your dough push down and then go back and forth like the arrow shows. Keep doing this with each one. If your counter is floured well your circles will come up easily. If not, well you may have to peel them a little. Now put them on your cookie sheets.
If you are making ornies use your straw to make holes. I forgot to do that with the batch I threw away. Believe me when I say you can't go back and put holes in very well while they are baking. Yep I tried :-/ lol

Pop your cookie sheets in the oven and bake at 325 degrees for 1 1/2 hours or until done.

Remove from the pan and put them on cooling racks when done. You can start decorating once they are completely cool.
Ready to decorate????
Once cool you will sometimes have dried bits of dough on the edges of the circle. Just take some sand paper and lightly sand to knock them off. I also give a quick sand to the front and back. Then wipe them off with a dry paper towel. Remember, don't use water!!!

Some of mine looked like this on the back. I just sanded a little and painted them anyway.

Next step is painting. I just used acrylic paint that I had on hand. Design and paint whatever you like on them. Use stencils, look at pics on the web, or freehand. After they are completely dry if you want to "prim" them up take wood gel stain (I like walnut) and use a rag to lightly rub the stain on. You can go back and wipe off some if needed to lighten it. I always use rubber gloves when using stain because it doesn't like to come off my hands very well. Also dispose of any rags properly. These rags can spontaneously combust if kept in a closed container.
Anyway, I hope this helps and have fun!!!! I have been having a blast making making these. Anyone want to come over and paint with me ??? lol


Edited... I have been asked to share the paint colors I used to create these.

Folk art- Navy Blue, Terra Cotta, True Burgundy (used for redware color), yellow ochre
As for the others I happened to have Olde Century Colors linen white and olde pewter. You could substitute these with an ivory and a darker sage green.
And yes, we DID ask for it.
ReplyDeleteThank you,thank you, this is awesome! I'm taking this to my daughter's and
make some little 'redware' things
with her.
Another great idea for next year's crafting.
Have a very Happy New Year,
Susan
Sorry, I'm a pest. Would you like to tell us what colors of acrylic paint that you used? You seem to have the
ReplyDeleteredware colors so right.
Thanks!
Yikes....I go MIA for a few days and you're a redware making guru....Love what you've come up with! These would make some awesome tree ornaments as well....If only I had a crafty creative bone in my body! You did amazing Miss Mary! Wishing you and yours a wonderful new year full of joy and blessings....Smiles & Hugs ~ Robin
ReplyDeleteSo pretty. Happy New Year & Blessings!
ReplyDeleteLara
Awesome job!! Thanks for sharing. :)
ReplyDeleteawesome!
ReplyDeleteWONDERFUL JOB!!!!!
ReplyDeleteHey, those look awesome. I want some. Good job. Happy New Year. -Steph-
ReplyDeleteWell how much fun was this Mary...how interesting and informative and FUN....I am sure going to be making these for my tree for next year.
ReplyDeleteNow do you think this technique would work for larger sized items...maybe like a larger size plate???
Blessings,
Happy New Year
Karen
Oh Mary, now those are adorable! Very crafty! You could leave these out on a year round kitchen or dining room tree. I love the way you share all the details, that helps a lot.
ReplyDeleteI'm extremely way behind on your blog but I hope you all had a wonderful Christmas and enjoy the new year!
Just wanted to share something we learned in a Class about Clay, Sculpey & Salt Dough...If you buy a cheap toaster oven the drying time seems to be less...and Meijer has mini cookie sheets, cake pans & other pans that are made for the toaster ovens...To cut the clay we were advised to go to the pipe sections in Lowes or Home Depot for unique shapes...We also used crayola "Air-Dry" Clay that we flattened out, Stamped, let dry and then painted with acyrillic paints and then sealed them...I used a bird stamp and it sooo looked like a redware bird...I'll share pics soon...Love your work!
ReplyDeleteThanks for the wonderful tutorial!Love these !Hugs,Jen
ReplyDeleteHey Mary theses turned out so good I hope my little tip helped!
ReplyDeleteYes... yes I do want to come over and paint with you! How fun!!!! Pinning! I have to try this!
ReplyDeleteCarmen and the Primcats