Saturday, January 28, 2012

Another Reveal...

This is the project I showed you yesterday morning that wasn't finished yet.  My own pattern for a strawberry pinkeep.  It is made from recycled wool, hand stitched seed beads, and a recycled glass candle holder covered in wax.  I think it turned out pretty good. :-)


I have another couple projects in the making that I hope to show you soon :-)
Pin It

Friday, January 27, 2012

Finally, Some New Creations

I have finally been able to take my new craft room for a test drive since I'm able to see much better.  Still not 100% because I'm still having issues threading my sewing machine.  I didn't care how long it took to thread it I was going to craft!   Remember the pictures I posted how neat and clean my room was? yep that's all over. I have stuff everywhere.  I have a bunch of new things to finally share with you though.  I know I promised painting techniques, but I just had to do some sewing.  I already told Steve that some of you are waiting on a painting tutorial, so we will need to get it done for you :-)  Anyway, speaking of Steve he was offered a full time job with a home builder a few days ago.  He will be working full time come Monday.  So, I'm sure this is going to put a cramp on my projects I have him doing.  Guess I'll just have to learn to use the power tools. LOL.  Knowing him he'll load them all up in his truck so I can't use them unsupervised. LOL.  My kid's did fantastic on their second grading period grades.  My daughter got a 4.0 and my son a 3.65!!! I'm so proud of both of them.  Last but not least, as hard as I've worked to pay off my bills I now have to go into bankruptcy. :-(  Since my ex let the house go into foreclosure the bank is now coming after us for the deficiency balance and I don't have an extra $35,000 lying around to pay them.  Please still believe me when I say Dave Ramsey's program is still an excellent program to get out of debt!!!  So enough of that let's get some show and tell going on.

For those who liked my make do chair, I made a few little pillows out of the left over fabric.  These will be for sale I just haven't decided on a price.  If you are interested email me and we'll work it out.   small pillow $5.00 elongated with birds $8.00 Large $10.00 all prices include shipping!!!!


I also made this really awesome settler's pillow made from linen like material that is batting and rag stuffed... again for sale no price yet... lol  Settler's pillow $12 includes shipping


Well, then I looked in my to do pile and found the base already prim'd up to make this cute pinkeep.


Then I saw all of these wonderful egg shaped styrofoam balls to do something with. Soooooo... of course I got the wax and coffee grounds out.  These were fabric wrapped first.  Basically I was experimenting with these.


Then I grunged up some fabric and started wrapping... and no I'm not leaving them on this plate. ;-)  I just carried them up from my craft room upstairs on the plate.


While we are on the subject of styrofoam... I absolutely HATE the smooth styrofoam egg shapes.  I couldn't wrap fabric on them or wax them for anything!!!!  I have a little something else I might try with them later.


We still aren't done!!!!

I finally finished my sampler from Joni Crenshaw Words of Praise Teresa's Sampler this morning when I got home from work.  I've had this thing in the works for months now.  I had two rows left to stitch and I decided I wanted to show you today so I finished it up.  I decided I don't like stitching the same color like the grass.  That got boring. LOL


AND..... I'm working on another secret project... I'm not done yet so I'll wait to show you everything.  I know you can tell what it is... but you don't know what it will be when I'm done :-)  Just know this... even with my eye I hand stitched these seed beads on.


I'm so happy to have my mojo back!!!! I LOVE my craft room!!!  I turn the heater on, some relaxation music, shut the door and get in the zone.  Today I need to price some items to get out to my booth.  It's time to get some new stuff out there.  Enjoy your day and weekend :-)


P.S. I am running a special on my salt dough redware ornies!!!!  Jump on over to my selling blog to check it out!!!!  Act now as I also have them for sale on Facebook too.  First come first serve!!!!!
Pin It

Tuesday, January 24, 2012

For Sale

I have a few things that I will be posting on my selling blog today that are for sale.  So hop on over and take a look. I have a few things in the works and will be adding them soon.

Click here to be taken to my selling blog.


Pin It

Saturday, January 21, 2012

Fabric Storage

Alright friends, I'm almost back to new!  I made a return trip to the ophthalmologist on Thursday and other than some scarring in my eye from when my pupil was stuck I am on the mend.  I can actually see the keys as I type and can read blogs again  YYIIPPEEE!!!!! I am slowly weaning off my eye drops and should be done in about 6 weeks.  However, he warned me at the first sight of it returning I am to call immediately otherwise see him in 5 weeks.  I hope I never have this again. 

Although, it did give me time to work on the craft room since crafting was out.  So here are some updated pictures...

Well now it doesn't look like I have that much fabric now does it? lol


We also got some new chairs so I can sit for hours down there... don't mind the mess... I'm not completely done organizing yet.


Then I redid my hutch a little bit and emptied out 2 tubs!!!! The bottom shelf is all unfinished projects I started and never finished.  Those will be finished up soon. Hopefully... ;-)


I'm hoping to start a few new things here soon since my vision is so much better.  I have some painting to do so that I can do yet another tutorial for those of you just beginning the primitive journey.  A must see to save yourself tons of money by "primitizing" your thrift store finds.  I will see you soon. :-)

Before I go I have to share this cartoon with you.  One of my friends Becca from Folk art by the Harbor posted this on my Facebook wall.  Is this not me or what???? LOLOLOLOLOL


Pin It

Tuesday, January 17, 2012

One Good Eye

Good morning!  Just a little update on my eye.  The redness is going away, the pain is pretty well gone, but I still have blurriness due to the eye drops.  So, what does this mean for you, well, it means I have not been able to craft.  I can't see close up.  No new projects, yet.  However, that doesn't mean we weren't busy.  Just because I couldn't see to craft didn't mean I was going to sit around all day and eat bon bons.  As you all will remember I am a hoarder of fabric mostly.  You know those impulse purchases from the thrift store in hopes of redoing to resell.  I had bags of stuff just sitting in my basement.  Now, I have come to realize I am a hoarder of a lot more than just fabric.  My basement is the catch all.  Since moving in I haven't really gone through and reorganized.  I always got an overwhelming feeling just thinking about it cleaning it.  So, this past weekend I could see well enough to start reorganizing.  Let me tell you it was a two day affair.  Steve told me that he would build me a craft table if I could clear out enough stuff.  At first it was difficult to let go of things, decor that I don't use but spent a lot of money on, crafting supplies, and junk.  I soon got the hang of things and just went donate and throw away happy.  I am so surprised that I could do it.  Anyway, long story short I got my crafting table and more....

Sorry, no before pictures... I'm crazy but not that crazy to show you lol.

After:

Steve made this shoe rack out of our old wood.  I'm guessing it's not going to stay in the basement long. LOL.  It is soooo awesome!!!!  My desk where I will keep all my business stuff, bills, and shipping stuff.


My new shelving.  We still have yet to put another shelf and some cubbies.  This is going to house my fabric.  Yes, you heard me right I am moving my fabric once again.  I am reclaiming my dining room as a dining room. 


OK, we still aren't done... My HUGE new rolling craft table.  I can move it out so I can get around it.  More storage underneath.  Oh yeah the stuff you see on top in the clothes basket and tub will be for sale soon.


Then above my table I had Steve put another shelf.  I want to add a clothes line under it to hold odds and ends of quilt tops, coffee stained things that are drying and whatever else. Plus he put up a new bigger light so I could see.


Before I knew he was going to build my shelf I thought I would reorganize my crafting stuff on something I already had.  The hutch was a thrift store find.  We will be redoing it and selling it soon.  After all the sorting and getting rid of stuff those tubs in the corner (fabric) and the stuff on the hutch is all I have left.  Go Me!!!!!


Today Steve will be painting the table and shelving unit.  Believe it or not I am having him paint it a white.  I figure since it's the basement I want it to be light since it's kinda dark down there with only 2 tiny windows.  I am super excited to be able to start organizing and crafting once again.  I can leave things out and not think I have to clean up every night so we can have dinner at the table.  Well, I better get off of here and go keep him company.  I just got off of my 24 hour shift and 'm a bit tired and have now developed a cold.  I think it's from being around all the dust while I was cleaning.  Hope you are having a good week so far.  I apologize for not commenting on all of your blogs I follow, but I still can't read very well and my eye gets tired very quickly.  I go to the eye doctor again Thursday and I hope he tells me no more dilating drops.  I'd like to be able to catch up on my blog reading.
Pin It

Friday, January 13, 2012

Make Do Chair Tutorial

So, you want to try a make do chair.  You've come to the right place!  I am hoping with my explanation and pictures that you'll be able to make your own chair.  This chair was Steve and my second make do chair.  The first was a lot larger, totally make do (no chair was used) and was slip covered.  We ended up selling it and after many requests I came up with a no sew make do chair.  Please forgive my mistakes as I'm typing this with only one good eye at the moment. lol

The end product...


Supplies:
a ladder back chair
a heavy duty staple gun and staples
scrap wood for the sides and back.
fabric (I don't recommend using a stripe or plaid on your first one)  My fabric is a "linen look" for the sides and seat and a heavier upholstery fabric for the back. (I'm going to guess 3-4 yards should do it.)
a friend to help hold,pull, and staple lol
I used 1/4" loft quilt batting folded in half ( I had it on hand already.)  It normally comes in a roll.  You can use what ever loft you want.
nails (to nail the arms) black cut tacks (to finish upholstery I used 1/2" and 11/16" they look like cut nails but much smaller) and hammer

My chair was in pretty rough condition.  I had it sitting on my porch so the seat was coming off from being in the weather.


First, we finished taking off the seat.  If you have a chair with a decent seat you can leave it on and use that instead of putting a new one on if you wish.  I didn't want to paint the frame, but you could certainly do that if you wish.  I prefer the natural worn wood look.


After much planning we decided that starting with the seat was the best choice.  Steve cut the piece of wood for our seat.  I wanted it a little wider to accommodate my ever growing seat. lol. Steve still can't sit comfortably in my chair. lol.  Measurements are shown below.  Then we used screws to attach it to the frame of the chair.


Unroll your batting and cut a doubled piece at least 1" wider on all sides than all measurements of your seat. Cut your piece 24" X 21" X 16 1/2" at least.  Enough to be able to wrap the batting to the underside of the seat and staple it to the seat.


Once covered with your batting, take your fabric and cut it large enough to fold and wrap around the bottom of the seat just like you did the batting.  I tried to keep the fold on the corners to the side because it will be covered later.


Woohoo your seat is done!!!! Next we will be putting the back on.  We wanted an angle at the top.  You would not have to do this.  The picture is kind of hard to understand so let me explain.  If you want the angle the top of the board should measure 17" angling into 19" which is the width of the piece of board.  The entire height of the board should be 30" and 28" from the bottom of the angle to bottom.  The back should rest on the seat.  Then screw it to the back of the chair and the bottom.  We decided we only wanted wood on the front of the chair.  You could put a piece on the back if you so choose.


We now need to put the sides on.  The back of the board needs to be shaved down flush with the back of the chair.  The other measurements shown are accurate.  Remember the back is at an angle and that's why it needs shaved down. Yeah that's me freezing my tushy off in the background. lol.


Alright I hope I can explain this next step.  You will need to cut batting and the fabric for the sides.  I always allow extra batting because you can cut off excess as you go.  The fabric needs to be 1-2" larger than the actual side measurement.  This is where it might get confusing... take your fabric and lay it face down (right side of fabric to seat). Take the edge of the fabric, 1" or so, and fold the edge up so that the right side of the fabric is facing the wood of the side and still on the seat also.  It'll become clear in a minute.  Now take your batting as shown (getting it as close as you can to the seat and back of the chair) as you can.  Where Steve's index finger is you should have a sandwich type thing wood, fabric, then batting on top.  Staple as shown.  It is easier to staple the top of the batting first then tuck the fabric behind the batting on the bottom.  I apologize that my fabric and batting appear to be the same color.  I will add a different picture if it is still unclear how to layer. PLEASE let me know if I need to. 


Once you have the inside of the arm stapled as shown start pulling up the fabric and stapling it to the top of the arm.  You will need to do do some folding of the fabric in front as you wrap around the front and to the outside of the arm.  Make sure you leave enough fabric on the bottom to be stapled to the bottom of the seat on the outside of the arm. If you look at the right side (the arm in the sun) at the crease you should have a nice folded edge that looks finished.  This is because we tucked the edge up under the batting then stapled as we brought it around to the front of the arm. Now pull your fabric on the outside and staple as shown below.  Note we have the extra fabric stapled to the backing.


The next step is optional.  I wanted arms on mine so we happened to have some old boards to cut and make them.  The measurements are up to you, but we cut ours 16" long.  The front is 4 1/2" wide.  We then angled it back to the back of the chair. NOTE:  You will need to notch out a little to be able to slide your backing fabric and batting through when we are ready to cover the back.  Nail down your arms to the edge of the side piece.


Do as I say not as we did.  We forgot to notch it out.  We had to do it later.  It sure would have been easier to do it at the beginning. lol.  Note that the arm is flush with the wood back not the chair back.


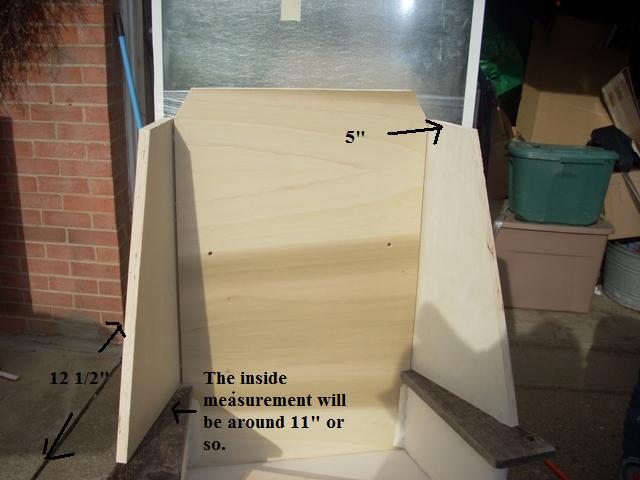
Next we will add the upper sides.  The outside measurement is 12 1/2" and the top is 5".  You will then need to make a straight line down to make your angle. 


You will have a gap on the back as you screw the sides to the back piece. You might want to screw the arms from the bottom up through into the side too.  You may want to drill pilot holes so that your wood doesn't split while putting your screws in.


We are getting there... hang in there.  We will now wrap the batting and fabric around these pieces.


We are layering just like we did on the bottom sides. Wood, fabric, and then batting.  Start stapling at the bottom then pull the batting and fabric towards the top then staple.  You will need to fold your fabric at the top because of the angle from top to bottom to make it look ok.  This is why I don't recommend stripes because they won't line up. Lots of pictures to show you how we wrapped and stapled.  You will need to staple the fabric and batting to the underside of the arm.


We are almost done!!! I forgot to take a picture of this next step so I hope I can explain it well enough.  We now need to do the back of the seat.  Starting at the bottom of the front of the back (WOW that was confusing lol)  you will need to layer again.  Remember, place the right side of the backing fabric face down. (The seat and the right side of the backing fabric should be touching.)  If you use some kind of backing like me you will really need to be careful lining up the middle of the fabric with the middle of the back of the chair.  You need to cut your fabric at least 2" wider so you can fold the edges in to make a clean folded edge and maybe 4" longer to be able to wrap it over the top as seen below and tuck at the bottom of the front. 


Fold and staple.  We then went back and used cut tacks every couple of inches on the front to hold the fabric in place.


Now you will need to cut the batting and fabric for the back.  If you are using fabric like me you will need to match up the print before you cut.  We then started at the top (see pic above) layered the fabric then batting and started stapling.


OK my friends you did it!!! You made your very own make do chair.  If you have any questions please email me and I will do the the best I can to answer them. Thanks so much for the overwhelming response for a tutorial.  Now how can I top this tutorial?  lol  hmmmmm.... what do I want to make next ?????
Pin It

RAK and an Update

First I would like to start by saying Thank You to Linda Parker of Parker Paradise for sending me these absolutely cute prim pillows.  I received them a few days ago, but with everything going on I didn't get to post them.  Linda is so generous.  She sends out gifts to people randomly and I was a recipient this time.  Are they just too cute ?  I LOVE them.


and the backs of them... The smaller one found a home on my bowl rack and the larger one on a chair.  I'll take pics soon.


Thank you all for the get well wishes.  I will try to email each and everyone of you back to thank you for your concern, but it may take a few days as I can only stand the computer screen for short periods of time and with the eye medication my vision is blurry in that eye.  The final verdict is in... I have what's called uveitis and iritis.  Basically, it's inflammation of the iris of my eye and also within the inside of my eye.  It is not a transmittable thing and you don't "catch" it.  It just happens.  He kind of compared it to arthritis of the eye. The reason it is so sensitive is right now my pupil is "stuck". It can't regulate to changes in light because of the inflammation.  Since this is the first time I've gotten it he said we will treat it drops, but if I get it again I will have genetic markers done to figure out why.  Most times people who get this have some sort of autoimmune disease going on.  One of my drops is 6 times a day and the other is 3 times one is a steroid and the other helps to dilate and rest my eye.  $80 later I now can start them today because they didn't have one of the scripts and had to overnight it last night.  I have another appt next week to be sure it is healing.  I think I will be on drops for 6-8 weeks.  Once done I have to get an eye exam.  I always put myself and my needs last and haven't gotten an eye exam in 8 years.  I am suppose to wear glasses, but haven't worn them in years.  So needless to say I got a lecture because we have eye problems that run in the family. lol.  So basically,this is where I'm at.  So much for the healthy New Year... lol  I told myself I was not going to go to the doctor or have any testing done this year.  Yep, 2 weeks into January and that went out the window. lol.

I will be working on the tutorial for the make do chair little by little and will have it posted this weekend.  I promise. :-)  Thanks for checking in on me I appreciate it.  Please excuse misspellings and missed words. lol
Pin It

Thursday, January 12, 2012

Tutorial Postponed...

I'm sorry to say, but the tutorial will be postponed for a few days.  In the last day I have developed something in my eye that looks a little something like this...


The doctor says it is not conjunctivitis or pink eye, but possible uveitis.  As I sit here and type I have my eye closed and looking straight at the keys on the keyboard because the computer screen is too bright to look at.  They are most concerned because my pupils are now unequal and the light sensitivity.  I go to see a specialist today at 2:30 to figure out what we are going to do.  I had it all day yesterday at work.  I even had to wear sunglasses in the morning on my drive to work while it was dark out because it hurt my eye.  If it starts feeling better I will try to get it done this weekend.  So, please check back.  Also, thank you so much for all of your kind comments on our chair because it made our day :-) 
Pin It