Wednesday, December 17, 2014

Preorder's Welcome!

I will now be taking preorders on my Belsnickle Santa's on my website.  Remember they can be painted anyway you wish.  The other day I was thinking one painted in lighter shades of green or tan for spring or an Americana themed one.  The possibilities are endless.  I can't wait!

Visit our website for more information...

Gettysburg Homestead

(click on the heading Gettysburg Homestead to visit)

Pin It

Tuesday, December 16, 2014

My Newest Venture

Hello All!

I just love crafting.  I love being creative trying new things but sometimes it gets out of hand.  I think I could actually have a craft store in my basement of all the supplies I have on hand.  Recently, I found a new crafting love. 

As I was decorating for Christmas and putting out my Santa's I thought how nice it would be to have some "real" Belsnickle Santa's.  Well, they are way out of my price range.  I am very thrifty when it comes to decorating as you all know.  So, the search was on.  What could I do to have what I want?  I found some unfinished paper mache Santa's online.  They were pretty reasonably priced so I thought what the heck.  If I mess them up I won't be out a lot of money.  I purchased 3 of them back in November.  The box came I opened them and then sat them on my craft table.  I couldn't get the nerve up to paint them.  I am by no means a painter. ughhh  I am a stitcher! lol.  Well, the other day I thought what the heck let's give it a try. I painted my first one.


Hmmm... that wasn't so bad.  It actually came out pretty good.  Let's try another.


I love him too!  I'm not too shabby at painting...


This guy was a bit more challenging and smaller.  That's why he was last. lol.  Leave the most difficult for last.  He turned out pretty good too!

Let me just say I LOVE painting these guys!  I think other people liked them too as the red and mustard ones sold!  WOW!  So I ordered more of these guys to paint in my spare time. LOL

If you are interested in the green one he is $34 plus shipping and is 9 1/4" tall.
Pin It

Sunday, November 23, 2014

Free Christmas Pattern

Lucky you!!!! Since we exceeded our goal of 900 likes on our Facebook business page I promised another new pattern.  So, please enjoy and be sure to show me your finish.


The recommended colors are:
DMC 3781
DMC 310
DMC 738
DMC 680
DMC 613
DMC 869
Pin It

Friday, November 21, 2014

New Patterns

Good Morning!!! Good News... I have added new Christmas cross stitch patterns with more on the way.  You can purchase the patterns through my website Gettysburg Homestead, not instant download, but emailed directly from me or through PatternMart for instant download.


Joy
 
Noel 
 
Poinsettia 
Pin It

Thursday, November 13, 2014

Projects...

Do you ever wonder if I actually do any crafting anymore? LOL.  Yes, I actually do.  I have been so busy designing some new Christmas patterns and stitching I haven't had time to work on much else.  However,  today I will show you some actual new projects that anyone can do easily and quickly.

First, need a rusty item in a hurry and don't have time for it to rust?  Yeah, me too.  I had this candle pan that would not rust no matter what I did.  I put it out in the elements and put stripper on it and nothing.  Uggghhh.  I didn't have a container big enough to use the peroxide, salt, and bleach mix.  Plus I didn't have time to wait.  I am very impatient when I want to finish a project.  Yes, my friends, there are some metal objects that have a coating that prevent them from rusting.  You will find this with some safety pins and bells.  Anyway,  I decided to faux rust this pan so I could finish one of my newest punch needle patterns.


All this is is modge podge and cinnamon. Believe it or not it is.  No rusty mess and I'm not afraid the rust will react with my punch needle.

Second... a quick and easy Christmas runner. 


But Mary, I don't know how to quilt!  I know this is what you are thinking... Am I right?  This my friends is a pre-quilted piece of fabric I found at the Goodwill.  This is what is called a double sided pre quilted fabric.  Basically it has the fabric you see and piece of batting in between and another piece of fabric on the back.  How easy is this?  I just googled it and you can find tons of this stuff everywhere.  All I had to do was stitch on the binding, which only took a little bit of time.  Everyone thinks you are a quilting master!  That I'm not. LOL Very quick and easy idea for yourself or for gifts.

I also did a little shopping this week.  My daughter and I checked out a reopened antique shop under new ownership.  It is much better then it used be.  I found this little stool for $10.  It is the perfect size for just about anywhere here at the homestead.  There are traces of blue and green paint and one of the legs on the other side looks like a rather big mouse chewed on it. lol.  I just love it.


I have another project I'm working on drying from it's coffee stain bath that I will hopefully be able to show you soon. It will be a new Christmas cross stitch pattern.
 
Have a great day and stay warm my fellow notherners. LOL.
Pin It

Tuesday, November 4, 2014

FREE Thanksgiving Pattern

Since I have reached a goal on my Facebook page Gettysburg Homestead of 800 followers I designed a new sampler just for you!!! I thought you needed a FREE pattern for the holidays.  If I reach 900 by Christmas I will design a FREE Christmas one too.  So, make sure you find me on Facebook if you would like another FREE pattern.

Just right click on the picture save it to your computer and print.  How easy is that?


I have selected some colors that I liked if you would like to use them.

DMC 3777
DMC 3829
DMC 830

Please email me with your finished projects. I would LOVE to see them!!!!
Pin It

Friday, October 31, 2014

Quick and Easy Pillow Covers

Some of you may remember that Country Sampler magazine was coming for a photo shoot here at the homestead.  If not, well they did. LOL.  Anyway, Tuesday was the big day.  Let me tell you I did not sleep well at all the few weeks leading up to it. Ugghhh!!!! So much to do, so much to fix, and so much to worry about. 

Anyway, in preparation for the photo shoot there were a few things that were suggested by the stylist that I have for the pictures.  One was extra pillows for my couch  Mind you this was one week before the shoot.  Now, I normally have only 2 pillows because 3 people sit on the couch at once most times and there is not much room left for pillows.  But you have to make your home warm and inviting.  Well, I knew I didn't have the money to buy pillow coverings so I would have to make some.  The question was when was I going to have time.  I had nail holes in the wall to fill, uh corral the dust bunnies, clean the entire house top to bottom.  Plus I had to work and make sure my kids got where they needed to go.  I had planned to stay up late a couple nights before the shoot and sew up a couple. Well, that didn't work out as planned.  I fell asleep. UGGGHHH!!!  Before I knew it the day of the shoot had arrived and NO pillow cases.  I secretly kept hoping she would forget about them and just use the two I had.  Uhhhh... not so much. WHAAAAAT?!?!?!!? Now what???? Oh I know... start sweating, get anxious, think about faking passing out... just distract... tuck and roll.  LOL. Next thing I know I came up with these...


I know what you are thinking... uh Mary the oranges don't match... yeah I know... but the stylist was ok with it.  LOL.  No they weren't all like this on this couch.  They were spread out.  Pretty nifty eh?  Let me let you in on a little secret. 

Have a someone coming over for a visit?  Need a quick change out on your pillows?  Have no fear a yard of fabric and safety pins to your rescue!!!! Yes, my friends, I did this for a national magazine photo shoot.  I just laid the pillow in the middle of the fabric and folded up the fabric and pinned it in place.


 But if you do this make sure those special visitors don't turn your pillows over!  I'm just saying.  You might be a little embarrassed to say the least.  Hey, all I can say is I just didn't have time to sew them up.  Adapt and overcome is my motto. 
 
Have a great day!
Pin It

Monday, October 13, 2014

Monday Treasures

Have you ever had an exhausting week.  Last week was one of those weeks for me.  I was busy getting patterns ready for a local cross stitch shop hop where I was featured at one of the shops.  I was at Staples making copies and Walmart getting photos.  Have I ever told you how much I dislike Walmart some days?UGGGHH!!!! They had just gotten some new photo machines and it took me over 2 hours just to print the photos I needed.  Everyone was having issues with the stupid computers!!! Then I ran out of pattern bags... story of my life.  Nothing can go easy and smooth. LOL.  Of course then there was work, running kids here and there, and keeping up with house work.  AACCKKK!!!!  Then yesterday we found out my daughter's Dad had a heart attack.  So, today I will be running her to the hospital so that she can see him.  Looks like my week will be busy again.

In the midst of all of my pattern drama my sister called and asked if I wanted to go shopping and some nearby antique stores.  Of course I WANT to go, but I really need to get my patterns together and delivered and well money is a bit tight.  BUT my desire to shop won out.  Plus my sister and I live in the same city, but we are both very busy and rarely do things together.  So, off we went.

I found some great treasures, but in particular this beauty...


The hardest part is not being able to use right now.  Country Sampler is now coming Oct 28th for pictures and I am not allowed to move anything.  So for now it is sitting in my basement taunting me every time I come in the door. I'm not sure why there is metal around the edges, but it may be coming off.  I just love cubbies though sometimes can be difficult to decorate.  I will be able to use it just in time for Christmas!!!

Then, after our discussion on decorating I found more gourds to decorate with.  I LOVE the warty ones.  I may be replacing the gourds you see at the top of the picture with these babies.  The small ones were $.50 a piece and the bigger ones $3.50.  Not too bad.


We also talked about dried berries and flowers.  Well, I saw these and had to have them.  I don't normally buy stuff like this but I loved the dark color of them.  I think I need to work on this peg rack a little.  Hopefully Country Sampler won't mind.
 
 
And yes I can't believe I bought dried flower heads, but I don't have any...


I haven't had a lot of time to design, but I did pick up my pencil and paper the other evening doing some sketches.  Hopefully I can now find some time to create.  I sure do miss it, but I am also glad that my patterns are getting out and about to brick and mortar stores.  Stay tuned.  Hopefully I will have something to show you soon.  

Pin It

Thursday, October 2, 2014

My Fall Decorating Tips

Happy Thursday and October!!!  As some of you know I have been decorating for fall quickly because Country Sampler has told me they will be here between Oct 7-18 to do a photo shoot of my home for fall.  I had been so busy creating that I had not completely done it yet.  So, lucky for me over the past few years I have been thinning out my fall items. It was very difficult to do, but I had and have way too much still.  I just find myself not totally redecorating everything like I used to.  Many of the things I use I actually leave out year round.  That cuts down on the totes. I am down to two totes of fall.

This is what I had to use to decorate this year.  The best thing is I didn't use everything in them.


So, I thought today I would share with you a couple tips I personally do in my home.

Tips

My biggest tip of all is to find things in nature that you can dry or use because they are FREE.  Free is always good.  Heck, I will pick berries off bushes string and dry them.  I pick up pinecones debug them and use them.  I'll pick flowers or weeds and dry those upside down (just be sure you aren't allergic to them. lol) I have used acorns in the past but haven't recently because they had bugs in them. YUCK!  I should have debugged them but didn't.  Black Walnuts are a huge favorite of fine too.  Do I supplement my décor with imitiations and fakes? YES!!!! Sometimes it is necessary.  OK... let's break this down a little and show pictures right? lol
 
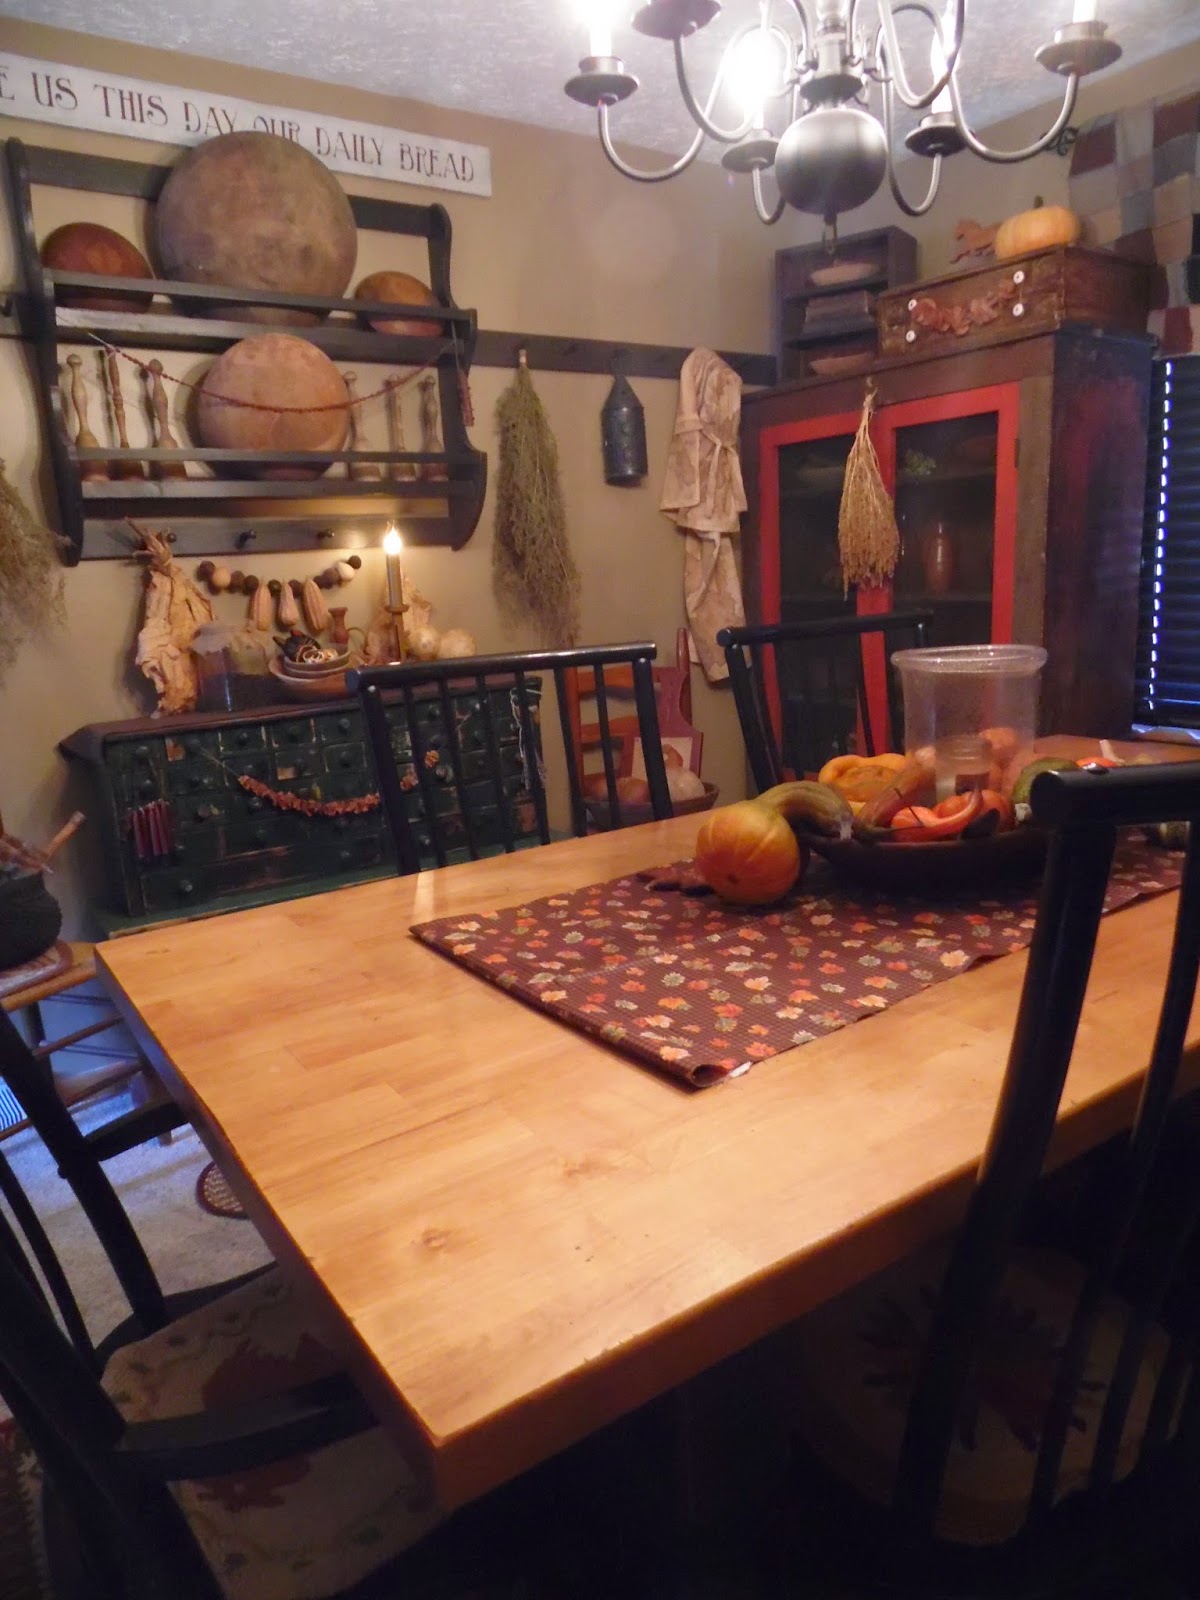
1.  I LOVE to decorate with dried gourds not just in fall but year round.  That way I don't have to store them.  You can either dry your own or buy them online.  I will be honest I did buy mine.
 
 
All I did was add a small fall berry pic to the pic above to make it look fallish.
 
 
A basket of gourds placed anywhere screams primitive.


2. I use dried sunflowers all year.  They come in all shapes sizes and color and make great bowl fillers.
 
 
Yes this was spring, but the light colored sunflower blends perfectly.
 
 
I know you can barely see the sunflower, but it is hanging on the ladder next to the fall tree.  I also used gourds with this display on the shelves and the tree.
 
 
These sunflowers are very dark. I LOVE using them as bowl fillers.  I bought these from a farmer on eBay.  Here is a huge tip... This person was selling sunflowers as bird feeders.  They were perfect heads and going for huge $$$$.  I emailed him and asked if he had some not so perfect heads and if he would sell them to me.  He said yes and sold them hugely discounted.  I wish I had room to grow them, but I don't so this was the next best choice.
 
3.  I love using dried plants, flowers, and weeds.
 

 Dried hydrangeas... can't beat them for year round color.  I'm sure either you or a friend has a bush that they won't miss a few bunches.
 
 
Sweet annie hanging from a peg adds charm to any room.  Now is the time to find it online if you need to buy it like me.  I also have a little tobacco hanging below the bowl rack, which is very brittle.  I may end up trying to make some to replace it.  I had to buy it online because where I live we don't grow it.  Also note the drieds hanging from my pie safe.  Not sure what it is but it came from a bush. LOL.
 
3.  Create as many handmades as possible.  Remember I am a single Mom and don't have a ton of money.  I have taught myself how to make things and have tons of tutorials for you to do the same.  Who cares if it isn't perfect!  Prim isn't perfect! :-)
 
Look in the above picture. See the table runner?  It is a piece of fabric I had in my stash.  I did not sew it or do anything to it but fold under the ends so you couldn't see the selvage edge.  Now who can't go buy some fabric and do that?


See my little Jack O' Lantern next to the light?  Yep one of my newest punch needle projects.  That quilt that is hanging... yep I made that too. 


The garland hanging from my shelf has wax corn I made (tutorial on how to make wax items on my tutorial page) and dried out corn husks.  Easy Peasey!
 
4.  Any item you have in fall colors of red, brown, tan, green, or black can be made to look fallish.
 
 
My brown couch is blah... but add some new pillow covers (very easy to make and change out for the season) and a quilt or coverlet and there you have it.  A change in rugs can also make a huge difference.  Now these aren't cheap, but I have seen them at Big Lots or on sale at Kohl's.
 
 
Let's go back to this picture.  The green drawers are perfect for Spring but also great for fall.  I just added a sweet potato garland to the front, gourds, and dried oranges on top.  I also used dried black walnuts and pods and made a garland for my bowl rack pegs.  Perfect fall vignette.
 
5.  Go ahead and use imitations.
 
In the above photo all of the gourds on my table are fakes.  You heard me!  I have had these for years.  This is one thing I believe is needed every year for fall.  I will not get rid of my collection.  I even pick up more when I find them at Goodwill or yard sales.  Are they too bright?  Rub some shoe polish or Briwax on them to darken them. 
 
 
A well placed fake pumpkin on top of my pie safe perfect!  I won't lie this is a big investment up front to buy imitations, but you can store and use them for years.  Think of how much you spend every year on real pumpkins and gourds.  In the long run this makes more sense.  I didn't use all my pumpkins this year for some reason.  They just didn't fit.
 
I also use branch picks and leaf picks.
 
 
Over next to my corner cabinet I used a huge crock and filled it full of fake branches and sunflowers.  Again, easy to store and a great investment.
 
 
On my table a fake pumpkin and a leaf pick.  This is the only leaf pick I own.  I don't like to go overboard with them draping from every cabinet.


Last but not least, the corn is real and I pack it up every year and use it again year after year.  I have never gotten bugs or mice because I keep it in my totes in the basement.  But, what I wanted you to see was that all my bittersweet is fake!  Yes, I have had this for probably 10 years or more.  I bought it at JoAnn's.  There is some real looking stuff out there.  Do you know how much $$$ I have saved from buying bittersweet? TONS!!!!  
 
These are just 5 things I do to save money and storage of my stuff.  The tubs are still pretty much full with old Longaberger fall baskets that I do not use, but spent tons of money on years ago.  I can't just bring myself to send them to Goodwill and I know I will not recoup my money I spent on them. 
 
Here is another tip I use.  If you don't want some of your fall decorations sell them.  Use that money to invest in what you really want.  I have done this for years now!  I save tons of money this way.  Trust me you won't miss anything that you sell.
 
Have a great day and happy decorating!!!


Pin It

Tuesday, September 30, 2014

Attaching Your Punch Needle Project to a Box

Hello my friends :-)  I apologize for being so late on this, but I had to get my home decorated for fall as Country Sampler is coming soon to take pictures and they needed preliminary pictures.  So , I will  be sharing some of my pics in the next few days.

Anyway,  a friend asked if I would show how I attach my punch needle projects to a box without using glue.  I personally do not like using glue on the paper mache boxes other than to attach the fabric not on the punch needle itself.  That being said I did use it on my owl I made recently and I really like how stiff it makes it.  Anyway, that's another day's discussion.

 
OK remember this sunflower I made?  It wasn't large enough for the box I had so I had to figure out something else to make it fit.


So let's get started shall we?
 
I chose the fabric I wanted for my box and coffee stained it.(Before and after staining)  I am soooooo glad I am a fabric hoarder.  I had this awesome sunflower fabric in my stash and didn't know it until I went looking. LOL Cute huh?


I needed to cut down my sunflower a bit.  I don't want all the bulky fabric.
 

I cut around it and left about 1/4-1/2" all the way around.


I decided to use the gold color around the box lid.  I measure the width of the band and add 1/4" or less to it and cut or tear it to the right length to fit around your box.  It is your choice but I like the torn fabric look around my bottom edge.
 

I know this picture is fuzzy AND messy, but that extra 1/4" you added to the width will get folded over.  What I mean is fold the top edge over a bit so you have a small "lip" that sticks up over the top of the box but yet enough fabric to reach the bottom of the band.  Enough to get a needle through.  You can finger press or iron press the fold.


I LOVE Mod Podge.  Yes I know you can make your own, but I am lazy. LOL.  You can also use white glue if you so choose.  Anyway, at this point I glue my gold band around the top of the box so it can dry while I'm finishing up the sunflower.
 
 
Alright ready to move on?
 
 
With the sunflower we are going to make a little "pillow/ pinkeep" per se.  I like to hand stitch my top to the base fabric because I can hide that white better as I tuck it in.  This is not a fancy stitch.  I just use thread that will blend and just stitch as I go around tucking in the white as I go.  Stay right at the edge of your project.  I like to bring my needle up within the first row or two of punch needle to hide the stitch.  Make sure you are using a piece of fabric that is long enough to fold over your project.


Perfect!


This is what my back looks like.


Take your lid place it over your project and draw around it centering it as much as possible.  See it wasn't quit big enough for the box.


Fold over your fabric and using a machine or hand stitch that circle you drew all the way around.
 
 
Carefully cut a slit through this side of the fabric only!  You don't want to cut your punch needle piece.  So that you can turn it right side out.


Now we're cooking!!! It looks like a "pillow/pinkeep"

 
The next step is up to you.  I personally like my piece to stick up a little so I used left over fabric from other projects and stuffed my pillow a bit.  You could leave it flat. Then I stitched up the slit.


Now let's actually attach it to the box top.  Your lid should be dry by now.  Place your project on the lid and begin hand stitching little stitches to bring the two together.  That little "lip" we left on the band makes it sooooooo much easier to get your needle through then trying to push it through the box lid.  TRUST ME! Yes, I did that. Ugggghhhh never again!!!  Just stitch completely around the lid.  See how the "lip" on the band is folded?
 
 
There you have it.  MY way of attaching my projects.  It is not the only way and may not be the right way, but it works for me.


If anyone needs a tutorial on covering boxes with fabric let me know and I will do one.  Otherwise there are a ton on internet to look at. 


Pin It