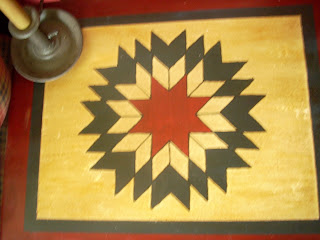
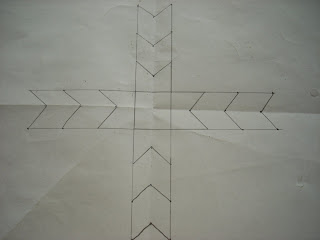
I fold my paper in half then half again to gve me the midpoint, then you can draw stright lines on the fold if you'd like for guide lines. Decide on the size of square in the middle you want to start with. This one is 1 inch. Now every measurement you do will be 1 inch with the exception of one time. Depending on how big you want will determine how long you make the lines off the side of the square. I extended mine 3 inches from the top and bottom of the square.. Now at every inch mark a dot. To get started the only measurement less than 1 inch. Go to the 1/2 inch mark on your lines of the square and measure up 1/2 inch and put a dot. Now this changes again measure up 1 inch from that first 1/2 inch dot and put another dot. Continue the 1 inch after that. Now connect the first set of dots as shown.
Draw 45 degree angles from the corners of the square and mark a dot at every 1 inch.
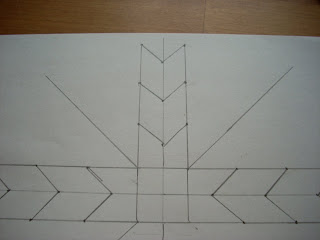
Draw straight lines up marking every inch. If you notice there is a 90 degree angle at the base of the line.. Now connect the dots. Do this all the way around by the way. I'm just showing one side.
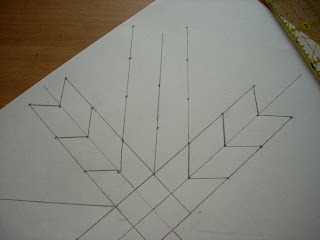
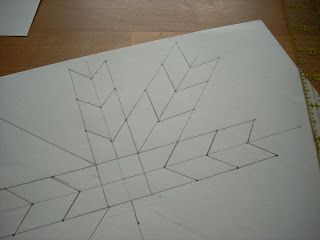
This is hard to explain so I'm hoping the pic shows it. The part you just drew prior draw a line straight up marking an inch with a dot. There is a dot at the 2" mark. Connect as shown.
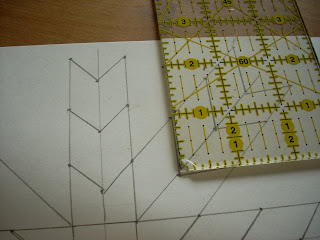
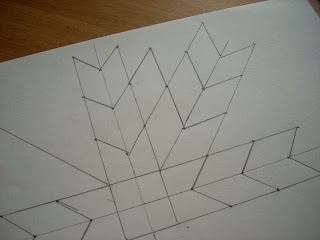
I did a couple more to show you how to continue. Now if you'd like I can color it in to give you the idea, but I think you'll get the idea from the top.
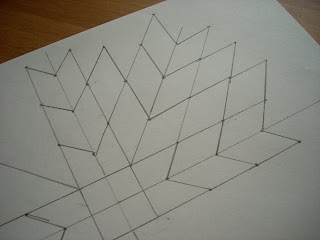
I am hoping I have not confused you, but if so give me a holler. I know what I want to say, but sometimes it all doesn't come out. LOL.
ok, this looks like math and I don't do math, but you make me think I can do this.
ReplyDeletethanks for sharing your expertise.
T
That is such a great design, Mary!! Thanks for sharing with us your great tutorial.
ReplyDeleteP.S. Glad I could help!
Love this...thanks for sharing!
ReplyDeleteYour step by step instructions are good! I think I could probably do this....and I know I could call Jason in to help if I had trouble...he's so good at those math measuring type things! I'm an eye it girl sometimes, but he's so exact!
ReplyDeleteI love that pattern. I'm going to print this off for future reference, if that's okay with you!
Thanks for showing us, Mary!
And by the way almost 3 weeks....no aspartame! Yay!
Tammy
This looks soooooo easy! Thanks so much Mary! WOnderful!
ReplyDeleteOh, that makes my brain hurt!! Mary, I am so glad I can always count on you for a laugh!! Prim fairy...haha!!
ReplyDeleteElise
Yes, you do make it look easy!! It's beatiful....
ReplyDeleteWell, I'm not too good at following directions, but you made this easy! thanks! I will have to try that when I find something suitable to paint it on. If you ahd just shown the pencil drawing all done, I would not even kow where to begin! LOL!
ReplyDeleteYou are so talented and creative!
Wow...it looks complicated but I do think I could follow your directions! It turned out just lovely! Dianntha
ReplyDeleteI don't know if I could stay in the lines!! That is a really good tutorial. Thanks for sharing. Julie
ReplyDeleteWow, you are so talented. I think I'll stick with my counted cross stitching. Unless, someday you come to Utah and can walk me through it :)
ReplyDeleteGreat Tutourial. The drawing looks so more complicated than it sounds.
ReplyDelete