My Pages

Wednesday, June 30, 2010

Some Redos and a Roadtrip

Yesterday I was off the entire day. I know before you say it I was going to post yesterday, but I had nothing exciting to post until last night. LOL. In the morning I crafted which I will get there in a moment. In the afternoon, I dropped my daughter off at a Bible study in the next town over and did some shopping. Then last evening Steve wanted to try a new restaurant so we went and then walked around the town and I took a few pictures for you to enjoy.

Alright lets start off with my redos. First, one is a new sign I made for over my gameboards. I took this pic outside thinking it would give more of the true color, but I guess not. It is black, red, and mustard.


Next, if you'll remember this was an old cutting board that had a flower painted on the front. Now...


Then with some help from my friend Ronda I have been wanting to make a pincushion to go with my boxes. So here you go.


I hate taking pics in the day time because of the glare from the sun.


Steve built me my peg racks for the dining room on Sunday, but they aren't done yet because he developed a kidney stone and was miserable. So I'll show you those when they are done.

Yesterday I visited two stores in Smithville, which is in Wayne County Ohio. There was a prim shop I was dying to go to, but just haven't. It is called Mimi's Memories. It was an amazing shop. I think I died and went to heaven. I bought a few treasures that I'll show you in another post because I didn't take pictures of that yet. It was prim perfect. No I didn't take pictures of the shop because the owner was not there for me to ask. Everything from amazing smelling candles, to treenware, dried herbs and garlands, to bonnets and aprons, you name it she had it. Then I went to an antique store that opened May 1st just down the street. I didn't want to look like a tourist taking pics so I was undercover in my car taking these pics with my phone. LOL


This shop too was so awesome. She had some really great treasures at very reasonable prices. There was stuff in every nook and cranny of that store and her hubby and son were bringing in more when I was there. I also bought some items at her store. I bought 3 bowls for display. One was wood, the other two were the kind that are kinda cheapy. Like the ones I have painted over before. So I have two new painting projects waiting for me. There was also a really neat picture I almost bought for the dining room, but I couldn't bring myself to spend the money for it. It was a hand painted colonial looking horse pulling a buggy with a colonial looking guy in the buggy. I may have to check if it's still there Saturday.

Then like I said Steve wanted to try a new BBQ place in downtown Wooster. Once again in Wayne County and is our county seat. It is such a neat downtown area. Lots of old buildings and architecture galore. I know it's hard to see but this was inside the restaurant. Big tall Victorian looking windows. The one wall was brick. I think it would be awesome to live somewhere that has an exposed brick wall. The food was excellent. I got pulled pork with sweet potato casserole and baked beans. They made it while you waited. Then for dessert if you weren't full you could order cheesecake from the Cheesecake Factory. Needless to say I was full and didn't get dessert.


After dinner we needed to walk off our food so we walked around the downtown area. So as to not look like a tourist again a snapped only a few pictures with my phone. LOL. Most of the places were closed so I did a little window shopping.

I just loved these tiles that were on the front of one of the buildings.


Pottery need I say more.


Another antique store that I will need to go to when it's open.


Lastly, this antique store I remember the name. Antiques in the Vault/ Art in the Vault. Let me just say WOWZERS!!!!! This shop in the front is basically an art gallery where local artisans sell the items. It was fantastic!!! Anywhere from pottery to jewelry to handblown glass and even rug hooking. It actually was open so of course we went in. I know where I'm sending Steve for Christmas for me.

In the back was the antique part. They had some decently priced items. No one was back there so I took pics of my favorites.


Friday, June 25, 2010

As Promised the Dining Room...

Remember I am not done with it yet. I guess I will never be done because I move things around a lot. But I believe I will be putting peg racks on either side of my black bowl rack. Just gotta get a certain someone to make them for me. I've only asked him for like 3 weeks now. LOL.


If you want to see more just click on home your pictures in my right side bar.

Thursday, June 24, 2010

Just Some Living Room Pics...

Not much is happening around the homestead except working. On Monday afternoon the doctor's office called and confirmed I do have 2 herniated discs in my lower back at L4 and L5. I have been scheduled for an epidural block for next Wednesday. After that I may look into a massotherapist and a different chiropractor to hopefully help also. At this point, I can't stand anyone touching my back because the skin even hurts. The guys at work have been wonderful. If they see my partner and I at the hospital or nursing home they come over and tell me to get out of the way. They have been doing the lifting and moving of patients. Then I get the lecture of why I shouldn't be at work. I tell them "HELLO single parent... I have to work because no one else will pay my bills!!!"

I cleaned the house on Monday and snapped some more pictures of the Homestead. So I'll quit blabbing and show you.


I will post the dining room pictures tomorrow. I have a ton of those so I figured you'd get bored looking at all of them today. LOL.

Tuesday, June 22, 2010

Painted Paper Mache Box Tutorial

As promised I will show you how I paint my boxes. I will show you with a paper mache basket because I happened to buy it for $.50 at the Goodwill. The technique will work on any paper mache item. I would suggest starting out on the stack boxes you can buy from Hobby Lobby or Pat Catan's or other craft stores. It was a struggle with the basket weave on this item.

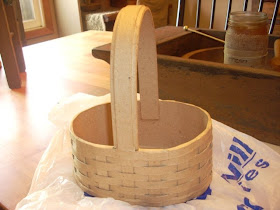
Here's the basket unpainted ready to go...


I always have a splash guard under my painting projects such as a plastic bag or a really cheap plastic shower curtain liner.

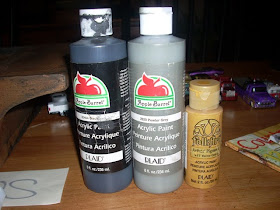
These are the colors I'm using today. Black, pewter grey, and yellow ochre. I will show you another color later on that I decided to use also.


I began by painting the entire piece black. It doesn't have to be perfect. This is the underneath coating. I like using sponge brushes the best. You can purchase them at home improvement stores or craft stores. Let this coat dry completely.


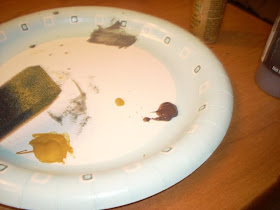
In order to add the colors on top you will need the following items. A sponge brush, a paper plate, paper towels, a cup or bowl of water, and of course colors.


Take and dip just the tip of your sponge brush in the water. Wring it out a little because you want it damp not wringing wet. Remember water and paper don't mix well. If it's too wet your project will melt in to paper pulp.


Now squeeze some paint onto your paper plate. I used the pewter grey first. Take your damp sponge and put it in the paint. Start brushing it on your item as such. See how it looks watery? Again you don't have to be perfect.


I know this is hard to see, but while your paint is still wet take your paper towel and rub in circular motion to "blend" the paint. You can see in places where all the paint was taken off. This is because we are using water and some of the paper is dissolving. This is why you don't want it soaking wet. I LIKE it when certain areas rub off. Work in small areas because the paint will dry quickly. If this happens just re dampen your sponge and run it over the drying paint and then rub with a paper towel. Dampen and add paint until your piece is done.


Alright the entire piece has been finished. Again I like some areas to rub off completely.


Are you ready to shield your eyes. These pics are horrible. I tried with and without a flash but this yellow is bright. After your grey is dry do the same technique with the yellow as you did with the grey. Water the paint down, paint, and rub with a paper towel.


After looking this basket was still way to bright for me so added another color. My trusty burnt umber. This prims everything right up!


Again squirt your paint on your paper plate. Now I used the same sponge that I used for my yellow. I don't care if the colors mix. You could use another one. I just store my sponge in a clear plastic sandwich bag and wrap it around the handle so it doesn't dry out in between coats.


Again use the same technique as above and VOILA!!!! If you find you added too much brown then take your same sponge brush and put a little yellow or grey in places that you want to lighten up. Or just add water to thin it out and rub with your paper towel.


I think this came out pretty awesome.