Friday, October 7, 2011

New Christmas Pattern Available

Merry Christmas!!! Early of course. lol. Just a quick note to let you know Olde Homestead Christmas pattern is now available. Please email me to order.

PDF pattern is $7.50 includes color picture, chart, and legend.
Mailed copy is $10.00 includes shipping with color picture, chart, and legend.

Pin It

Monday, October 3, 2011

UPDATE Playing With Wax

First, I apologize to some of you that I told I would be doing an update on my wax on Friday. Friday was not a good day for me. I was suppose to work, but for the first time ever I called off. I could not stand or walk at all. My sciatica kicked into high gear. It has never been as bad as that day that I was dry heaving from the pain. Then on top of that I had my other lovely side effect from my Z Pak still hanging on. So, today I head back to the doctor to get that little thing taken care off. I think having diarrhea (this is why you visit me because I always give too much info..lololol) for over a week straight is a little too long. I did manage to drag myself to work Saturday and Sunday.

So here I am today with my little update... I didn't like the corn so I threw them back into crock pot and started again.

First, this is what my wax looked like all melted down. There have been several questions as to whether or not you could make tarts this way... I can't answer that because I haven't tried it. OHHHHH I did try to add a little candle fragrance to it and got a better scent this time.


This time I didn't oil the mold but did dust it with cinnamon.


The results were good and bad. The good part is the corn still came out of the mold just fine after I put it in the freezer. The bad part is the cinnamon was absorbed into the wax. So the cinnamon doesn't make a difference.


Next step I sprinkled on the cinnamon and rub it in. These worked so much better without oil.


Now, I was also asked about what to do with the wax that is left over in the crock pot. If you are making items unscented you could just leave the wax in it and let it harden back up and just add more wax next time if you need it. Since I used a scent in mine I will probably throw the insert in the freezer for a bit and just pop it out and throw away what's left so I can use a different scent next time. I didn't have much left when I was done though. I use the freezer method on all my candles when I get to the bottom if I want to reuse the glass container they came in.

NOW... How the heck to put a hanger in them??? Well, I turned to you my Facebook friends for help. I got tons of responses and I settled on one...

So, have a seat and light a candle and let's get started... obviously you will need some kind of candle. This one was close to me so I lit it. lol


Next, grab some wire. I happened to have rusty wire on hand. Snip off enough wire to make a decent sized hanger. I decided to try it on my pumpkin guys...


Remember when you were told not to play with fire? Well, you will be breaking that rule today. Take one tip of your wire and place it in flame for just a few seconds. The heat didn't travel that far up to burn my fingers. It doesn't have to be really cherry red hot.


Now take the end that is hot and push it through the wax where you want your hole. It'll melt like butter... once it's through I just put a little twist in the wire to keep it from coming back through. I made two holes in mine so I just repeated the step.


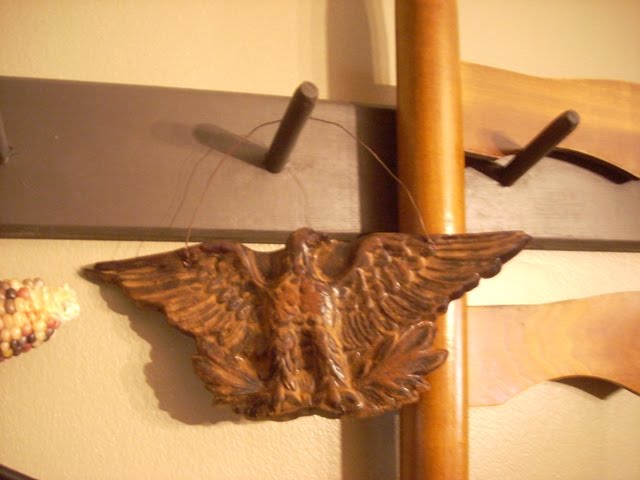
AND the eagle...


I bought another cute jack o lantern mold last Thursday at Family dollar to make little bowl fillers. I'm just having too much fun with this now. :)

I moving very slowly today so I'm not sure exactly what I'll get accomplished, but guess what???? I made a haul on fabric again at the Goodwill. I know I need more of that like I need another hole in my head. LOL. I hope to feel up to a least taking pics of it to show you. Have a great day everyone!!!
Pin It

Thursday, September 29, 2011

Playing With Wax for Ornies...

Well, I've been wanting to try to play with wax for a long time. I see all these beautiful wax sheep, pumpkins, and angels on different websites and think I'd LOVE some, but being on a tight budget they are not a necessity. So, after visiting a few of my friend's blogs and my BFF Rose making the wax corn for me I decided to give it a try.

I've sort of tried it before using an old coffee can and the double broiler method and got results I wasn't happy with, so I went with the crock pot method this time. Steve happened to have one that he wasn't using so he gave it to me to use. (He's so awesome!) But it seems like every time I go to the Goodwill I see crock pots pretty cheap. I also bought a 3/4 burnt red pillar candle at Goodwill. I've been picking up all kinds of candles at the Goodwill when I see them for this purpose. I threw the pillar OK I put the pillar in to the crock pot wick and all. I turned it on low and nothing happened so I turned it on high and the candle melted great. I also had a ladle I bought at the flea market for $.50. I figured I better not use my everyday ladle. LOL. OH... I wasn't thrilled with the idea of red wax so awhile back I bought some wax tint from Pat Catan's hoping that one day I would try this. I just cut off a little piece and threw it in when the other wax was completely melted. I also put some candle scent in it, but I don't believe I put enough in because well, you can't smell it. LOL. I also pulled the wick out of the melted wax with some tongs and just threw it away.


I also needed some molds. Since I was just having fun I tried 3 different molds. I had plastic, cast iron, and a tiny aluminum cake pan. I got the cake pan and the plastic mold at Goodwill.


I wanted to try this great eagle mold first. This thing is huge!!! It is about 9 1/2 in wide by 3 1/2 inches tall. I sprayed some cooking spray oil in my mold first. Then I used my ladle to pour the wax in the mold. First problem... the plastic distorted and there were places where the wax didn't reach so I put the ball jar lids under each of the edges to level it out. When the wax thickened a bit I put it in the freezer to cool it off. I only left it in the freezer for 10-15 minutes maybe. Just until it was completely set. Pulled it out, twisted the mold a little and out it popped. Now this part is where I need to experiment a little more. I didn't dust the mold with cinnamon before I poured the wax. After I popped it out of the mold I dusted them with cinnamon and rubbed it on. They look great but I'm not sure if the cinnamon will stay on them. I am also going to try to put holes in them today to hang them.


Close up....


After I worked on them I decided to try the cast iron and aluminum. I sprayed the molds just like above then poured the wax. I do not like how my corn turned out. I think I used to much spray because the cinnamon just turns dark and you can't see the kernels. I then tried the cake pan. I didn't fill it all the way up to the top. I poured just enough to to make it about 1/4 to 1/2 inches thick. These popped right out of the pan very easily. I used a paint brush to brush the cinnamon out the eyes, nose, and mouth of the jack o lantern. I actually made two jack o lanterns, one was in the freezer when I took the picture.


All of this came from one pillar candle found at the Goodwill!!! This was a pretty cheap form of entertainment yesterday :) I would still like to try another round of wax things experimenting with different techniques. Don't worry you'll be along for the ride. I'll post another entry when I do. :) I'd like to find some other molds to. I have some old jello molds, but I think I'd like to try molds of things like I see on prim websites. I just need to figure out where to buy them from.

Anyway, as promised I took some pics of my daughters full size quilt top I made. I'd like to finish it soon, but I need to buy the fabric and batting slowly when I have the money.


I'm off today so I have few more things to work on like putting holes in the ornies and sanding and staining a few things I painted yesterday. Hope you have a great rest of the week and weekend. I probably won't be back until Monday since I work all weekend long.

There was question as to what I meant by candle tint. This is what I used.

Pin It

Wednesday, September 28, 2011

A Stitchery Finish

I feel like I've been away for ever! I know it has been a few days and not much exciting has been going. I had to call the doctor for another antibiotic to get rid of this infection I've had. He called me in a Z-Pak. Well, whatever it is I don't like it very well. OK it doesn't like me very well. I can't decide what's worse... being sick OR the side effects of it. UGH!!!! Yesterday was my last day of it and I'm feeling a bit better, but I still have a horrible cough.

Sick or not I got some things done. For those of you who aren't friends with me on Facebook, I started a Christmas stitchery on the first day of fall. LOL I know really??? The mood struck so I ran with it. So, basically, this took up most of the weekend trying to get it done so I didn't do much else. The pattern is done for this stitchery with the exception of the cover page. I think I will stain it again to get it a little darker, frame it, and take pictures. I'm hoping to have this pattern out very soon.


I did manage to get all 3 borders on my daughter's quilt too. I just need batting and a backing fabric so that I can finish it. I have already started thinking about my next quilt project. However, I need to concentrate on a few more fall goodies for the booth and then start Christmas stuff. I know I do this to myself all the time. I always get a late start with the upcoming holidays then feel in a rush to get them finished. I hate when I do this to myself. LOL. Anyway, the borders... I couldn't take the quilt outside to take a photo because the grass is all wet. I will try later and post a picture of the entire thing tomorrow.


I know this short and sweet, but I really need to do something today other than hang out in my pajamas drinking coffee today. I will try to be back tomorrow with some interesting things I worked on today.
Pin It

Thursday, September 22, 2011

Rag Ball Tutorial

I just came off of a 24 hour shift and am sitting here drinking my coffee and sweating. Seriously, it's not even 70 degrees outside and I'm sweating. Must be hot flashes since I turned the BIG 37 on Tuesday. LOL. I treated myself to some new fall fashions at the Goodwill for a birthday present. Now I promised myself I would clean out my closet. I got to thinking that some of my clothes in there were bought before my 12 year old was born. I'm thinking it's prolly time to get rid of them. lol. I like to think if it still fits why get rid of it. I really think I'm not seeing the entire picture when I wear them because I do not own a full length mirror. Anyway, I just need to remember that just because they make it in my size doesn't mean I look good in it.

Alright, I know many of you already know how these are done and have already made some. For those of you who have not here's a quick and simple tutorial.

You will need some Styrofoam balls and fabric. These can also be made with fabric only and no Styrofoam balls. Anyway, I had already coffee stained my fabric for other projects. This is great way to use up your scraps. I took my fabric and tore 1/4 to 1/2 inch strips from the fabric.


Now take one of your balls and start wrapping one of your fabric pieces around overlapping as you go. Keep adding strips. When you end and start a new strip make sure you wrap over the loose ends so they don't come undone.


WOW! My pictures really stink on this tutorial... It's a good thing because this was my first one and I didn't do a great job. Yes, you all know I am particular, OK anal if you must, for things to come out right the first time I do things or I won't do it again. Yes I am my own worst critic. Hence I have many started projects that haven't been finished. lol


Anyway, in the end I had different size balls and finished them up. Woohoo!!! another UFO finished up. :) I must really stop drinking so much coffee in the morning when I take pics. LOL.


I've gotten two borders on my daughters quilt with one to go. The top is getting quite large and I have no idea how I'm going to finish it since I've never done one this big before. I think I may just tie it, but who knows. Otherwise, I have no idea what I'm going to do today. It's just me until the kids get home from school. Oh I have lots to do, but I don't know what I want to get into yet. I may play in some wax to see what I can make. This is easy because if it doesn't turn out you just throw it back in and remelt it.
Pin It

Tuesday, September 20, 2011

Fall at the Homestead

I finally feel human again. I'm still sick, and may have to call the doctor for more medication, but at least I can now taste and smell. Since I was feeling better I finally edited and took pictures of my home for fall. As of this morning, I haven't added any dining room pictures because I have all my quilting out trying to put the borders on my daughters quilt top. I will hopefully get to the point of taking pictures here in the next few days. BUT don't hold your breath lol.

So please click HERE to look at the Homestead for Fall....

Pin It

Saturday, September 17, 2011

New Items For Sale

I am feeling somewhat better so I thought I'd get busy and list some things. I am still going through and may have more.

Please visit The Gettysburg Mercantile for more items and pricing.


Pin It