Monday, January 9, 2012

Make Do Chair

Steve and I were both off today, so as promised, we made a make do chair with absolutely no sewing involved!!!  It was 42 degrees out ( just a bit chilly) and it took all day because it was plan and work as you go.  We had to build from the bottom up literally.  So hopefully the tutorial will have you making them in no time :-). I have pictures that we took along the way and will be putting together a tutorial soon. 

Before: We did have to finish cutting off the seat as it was not able to be saved.  I don't like altering old things, but we I didn't have a choice :-/  I was using this on the front porch before. lol.


After:  The plain fabric is linen like (I've seen it at Jo-Ann Fabrics) and the printed is upholstery fabric.  Both fabrics were found at the flea market where I have my booth. :-)  and they were really cheap!!!


The back:


Just thought I'd show you the end product first.  I work the next two days, so hopefully by the weekend I will have the tutorial done.


Pin It

Saturday, January 7, 2012

FOR SALE

They are done!  I have the following for sale $5.00 a piece includes shipping.  OOAK Salt Dough 3 1/2 inch ornies.  They will have jute hangers when shipped.  Please specify by number and picture order when ordering.  Email me to purchase. First come first serve.

Black Ware


 Green Ware
#2 SOLD


 Red Ware

Terra Cotta Ware
 #4 SOLD


White ware
#5 SOLD


Yellow Ware
#6 SOLD

Pin It

Tuesday, January 3, 2012

2012...


Happy New Year!!! Ok Ok I'm late.  Better late than never right?  I hope everyone had a safe and wonderful holiday.  This is the joke between Steve and I.  Supposedly the world is going to end this December and I told him that I would marry him on the day that the world ends. :-)  lol So, I had to post this.  Alright I just noticed that beginning is spelled wrong!!!!!!! LOLOLOLOL Sheesh!!!
 
Anyway, I want to thank you for all the kind words, encouragement, and friendships in 2011 that I have received.  You all are truly a blessing for me.  Steve is awesome and all, but sometimes he just doesn't "get it."  So, I come to you to vent, share, and look for advice.  And boy oh boy you all never disappoint me. :-) So thank you new and old friends. I hope that reading my blog gives you great ideas, a can do attitude (especially when I tell you what not to do in my tutorials lol), and most of all a place to come relax and be yourself and not feel like an outsider.


For 2012, most people make resolutions that, well, just don't happen.  I am one of that crowd! Every year I say I'm going to do this or that or be someone I'm not.  This year I really have been thinking a lot about obtainable resolutions.  Maybe if I can accomplish one I will get the motivation to do more.  First, and foremost, I have got to stop biting and picking at my nails and cuticles.  I have done this since I was a kid and have tried a lot of things to quit.  Obviously none of them have helped. lol.  What's different now? Well, I was watching the OWN network (Oprah Winfrey Network) yesterday at work and they were talking about weight loss.  I know what does this have to do with nails... hold on getting to that. lol.  Anyway, she has a trainer by the name of Bob Greene who was on her shows yesterday.  He was telling people that in order to lose weight you have to figure out what the reason is that you eat.  The same applies to me.  Why and when do I pick? So, over the last few days I realized that I pick when 1.) I'm just watching TV 2.) stressed (at work) 3.) bored.  Yesterday I made a conscious effort to catch myself and stop. Most times I don't realize I'm doing it.  When I caught myself I put hand lotion on or picked up my cross stitch and started stitching. At this rate I should finish a lot of new patterns. lol. I'm hoping I can retrain myself into finding something else to do (not eat lol) to make myself stop.  My massage therapist recommended I put gloves on so when I saw the gloves it would tell me to stop.  I know not a huge resolution, but obtainable.  If I conquer this I will set another resolution, but not until then.  I can only work on one thing at a time.

I've taken the Christmas tree down and am looking at my bare house and have started making new plans to move furniture.  I foresee a huge flip flop of furniture pieces.  We have sold our TV cabinet in the living room.

This one...

We will be doing something different.  Steve has an idea and I LOVE it too.  It won't be ready for awhile so we will make do with other furniture until then.  I think I might be seeing a faux fireplace in the future ;-)  I have some other pieces I want to take out and move around.  Actually I'm kind of excited because I will be making a true make do chair. I have a ladder back chair hanging out in my garage begging for a face lift.  I got the most adorable upholstery fabric awhile back.  I'd like to do a tutorial for it, but it may take some time.  I'm trying to make it a no sew tutorial for those of you who don't sew obviously.  I've had several requests to do one.  I will say you will need to cut wood and be able to use a hammer and nails and of course scissors (Remember no running with scissors I wouldn't want you to poke your eye out because it's all fun and games til someone gets their eye poked out. lol) I have the plan of attack in my head, now it just comes down to time. 

I'm glad many of you enjoyed my last tutorial.  I have had a ton of hits on my blog!!!! So thank you very much.  PLEASE send me pics or post them if you made some faux redware.  I'd LOVE to see them and with your permission post them so everyone can see :).  Maybe we can come up with a few more tutorials this year.  I think I may step back and do a tutorial on distressing furniture or such for those who may be new to the prim side.  I have a friend on Facebook who would LOVE to learn how. 

I have some planning and painting to do so I will see you soon.
Pin It

Saturday, December 31, 2011

Faux Redware Tutorial

You asked for it, so you got it :-)  WARNING: I am cautiously posting this because I just mixed up a new  batch and when I looked in the oven the circles were starting to puff up.  This is NOT the look I want so I am waiting it out to see what happens.  I did exactly as I did yesterday except I didn't knead it as long, so I'm hoping they fall.  They did not fall and I threw them all away.  Read on and I'll explain.

Getting Started:

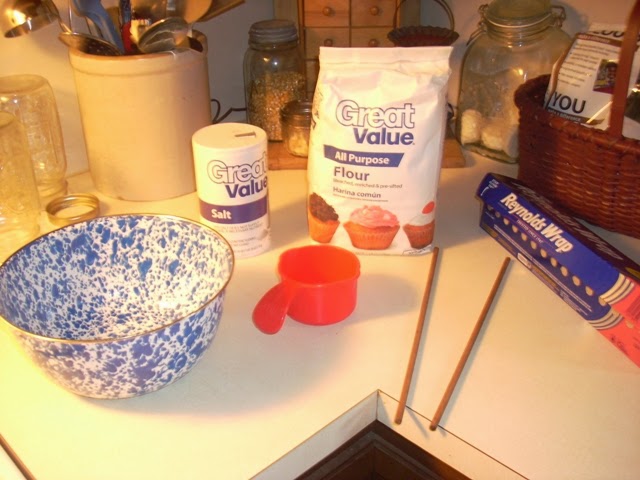
What you will need:  I know what you are thinking... why do we need those dowel rods Mary?  I also forgot to take a picture of a drinking straw.  You will need this too.


Line some baking sheets with your foil.  Since this stuff is non-toxic you could just put them directly on the the sheet.  The flatter your foil the less "wrinkle" look you will have on the back of your circle.


Salt Dough Recipe I found here.  (there are a few more recipes on this webpage :-) )

2 cups flour
1 cup salt
1 cup warm water

Mix the salt and flour together in a bowl. Add half of the water and stir.  Add the other half stirring til most of the dry ingredients are mixed in.  Sprinkle your counter with a little flour and knead the dough for 5-10 minutes. This IS very important if you want flat circles!!!! As I said at the beginning, I didn't knead the dough very long and the circles puffed up. I don't want puffy.  Learn from my mistakes!!!! lol  So this second batch I kneaded.  I took and separated the dough in half.  Roll out half of your dough.  This is where your dowel rods come in.


This tip is from Karen N., who emailed me...

When I read your blog today about rolling out the salt dough I just had to share with you something I do to get the dough rolled out evenly.  I did this last year when I was rolling out gingerbread dough to make gingerbread men ornaments and it worked like a charm.  I just cut two pieces of dowel (I used 1/4 " dowel cause I wanted the dough to be about that thickness so just use whatever size dowel you want) put the dough between the dowels and have the edges of the rolling pin run over the dowel.  Presto.....perfectly even dough.

Thanks so much Karen!!!!  Now we can all benefit from your wisdom!!!!  Now that's a smart lady :-)


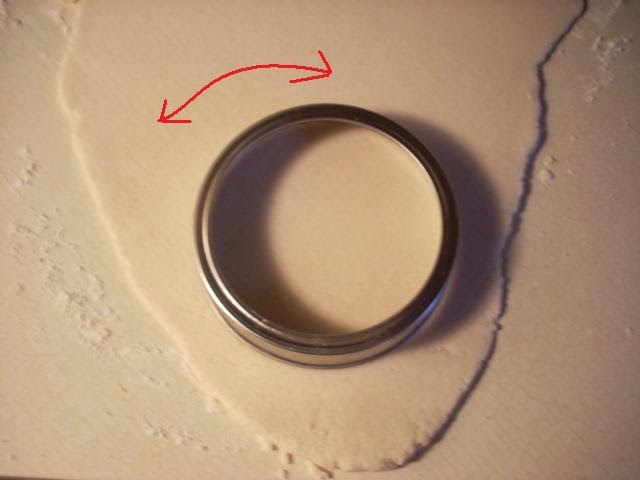
Now for my secret... Do you want perfect sized circles??? Use the lid to a wide mouth ball jar.  Put it on your dough push down and then go back and forth like the arrow shows.  Keep doing this with each one.  If your counter is floured well your circles will come up easily.  If not, well you may have to peel them a little.  Now put them on your cookie sheets.


If you are making ornies use your straw to make holes.  I forgot to do that with the batch I threw away.  Believe me when I say you can't go back and put holes in very well while they are baking.  Yep I tried :-/ lol


Pop your cookie sheets in the oven and bake at 325 degrees for 1 1/2 hours or until done.


Remove from the pan and put them on cooling racks when done.  You can start decorating once they are completely cool.

Ready to decorate????

Once cool you will sometimes have dried bits of dough on the edges of the circle.  Just take some sand paper and lightly sand to knock them off.  I also give a quick sand to the front and back.  Then wipe them off with a dry paper towel.  Remember, don't use water!!!


Some of mine looked like this on the back.  I just sanded a little and painted them anyway.


Next step is painting.  I just used acrylic paint that I had on hand.  Design and paint whatever you like on them.  Use stencils, look at pics on the web, or freehand.  After they are completely dry if you want to "prim" them up take wood gel stain (I like walnut) and use a rag to lightly rub the stain on.  You can go back and wipe off some if needed to lighten it.  I always use rubber gloves when using stain because it doesn't like to come off my hands very well.  Also dispose of any rags properly.  These rags can spontaneously combust if kept in a closed container.  
My friends and I were talking today about these and we all agreed you might need a polyurethane or polyacrylic coat.  We also thought maybe modge podge would work too.  If you plan on storing them keep them out of anyplace that might be damp.  My friends pack those little silica packets that come in shoe boxes in with them and have never had a problem.  I have yet to protect mine, but I will.


Anyway, I hope this helps and have fun!!!!  I have been having a blast making making these.  Anyone want to come over and paint with me ??? lol


Edited...  I have been asked to share the paint colors I used to create these.


Folk art- Navy Blue, Terra Cotta, True Burgundy (used for redware color), yellow ochre

As for the others I happened to have Olde Century Colors linen white and olde pewter.  You could substitute these with an ivory and a darker sage green.


Pin It

Friday, December 30, 2011

Faux Redware

Alright, I know it's late for the reveal because I normally post in the morning.  I started painting then stopped to make a faux Roman Shade panel for my nephew's room when my sister came over.  Anyway, my experiment... you all know I LOVE redware, yellowware, and blackware.  Most times it's too expensive for me to purchase.  What's the next best thing? Of course, Make it yourself!!!!

The experiment was which did I like better... salt dough or clay...

Salt dough...

So, let's start with the salt dough... this was my first attempt as an adult.  I found that I'm not good at rolling out my dough evenly. LOL.  It was really easy to work with, however.  It dried quickly in the oven.  Downfall I guess if you want to call it.  I don't think it's bad because it makes them look more like crazed clay is that I think my dough may have been to dry because I got very small cracks.  BUT the stain went down in them and like I say made them look crazed.  I have 10 more to paint. LOL.  The recipe I used left my circles flat.  They didn't "puff" up.  This is from my dear friend Geesha  "Hey Mary I will tell you this what ever flour you use in your salt dough mixture it will effect the shape if you want a more flat use all-purpose if you want it a more 3-D or texture like use the self-rising."  Thought I'd pass it along :-)  The flat look is what I wanted. 

Sculpey clay...

Well, let me say that these take a LOONNGGG time to dry in the oven.  These ones are still not completely dry because they are flexible.  They should be rigid when "cooked" completely.  I had them in for like 4 hours.  It is suppose to be 15 minutes for 1/4"  uh huh right....   Needless to say I'm impatient.  The clay models a little better to make bowl shapes.  It takes more coats of paint to cover the white clay.  It's a flatter surface to paint on.  So, all in all they are ok... at best.  I wasn't going to scrap them yet.  I may give it another try.  OH the biggest problem is sculpey clay is way more expensive than salt dough :-)


There you have it.  Was it worth the wait???? I think they turned out pretty good if I can toot my own horn. LOL.  Anyone want be to post a tutorial for these? Leaving it open for discussion... just let me know :-)
Pin It

Thursday, December 29, 2011

Experimenting Day

Good Morning everyone!!!  As you can tell by my post title, today is Experimenting Day.  You know I always LOVE to try new things.  So, as soon as I came home from work at 7am I started my Google search.  Why? you may ask. Well, last night as I was working we had down time in which we are allowed to sleep on our 24 hour shifts.  I laid there... and laid there...and laid there.  I was not able to fall asleep because I had a massive flow of crafting ideas and was unable to sleep.  I was so excited to start them today that I didn't lay down after I came home.  Anyway, I have never worked with salt dough (as an adult) to make ornies.  So, I found several different recipes and have yet to decide on one.  I will though this afternoon when I have a little more time.  HOWEVER, if any of you have a favorite salt dough recipe to share please do!!!  You have a few hours yet before I start them. :-)

In the meantime, I am working with this... also a new medium for me to play. 

I have several items baking right now.  I don't want to show you yet until 1.) they work and look wonderful or 2.) I fail miserably and tell you what not to do :-)  I will be ecstatic if it turns out like I hope it will.  Then I will have some very special items to sell if it does. So are you ready to hurt me yet since I won't tell you? lol

I hope to be back tomorrow with the finished products.  Stay tuned :-)
Pin It

Tuesday, December 27, 2011

Pattern Re-Releases

A late Merry Christmas to all of you.  I'd like to say my Christmas holiday was wonderful, BUT I can't.  I spent all weekend working.  YUCK!!!!  We did get to open our gifts Sunday night after I got home.  It was looking like we'd have to wait until Monday night, but my son texted me to come pick him up from his Dad's house Sunday night so we could open gifts.  I was thankful for that.  Me, being the procrastinator that I am, waited until December 23rd to order Steve's Christmas presents.  One of them arrived today. :-)  He said he understood.  I just couldn't decide what to get him.  He buys what he wants, for example,  he bought the DVD set of the television show "Coach" wrapped it then put my name on it as if I gave it to him.  LOL. I guess that made it easy.  He still has 2 more gifts coming in the mail.  I'm sure he will like them.

Other than that, last week, I got absolutely nothing done since I worked everyday but Thursday.  So today, my day off, I decided to re-release some of my patterns.  These were from 2008, when I first decided to make patterns.  I had to go back in and make some minor changes to them, but now they are once again available for purchase.


Primitive Pineapple Bowl Fillers


Primitive Sheep Pattern


A printable PDF format is $8.00 while a printed pattern is $10.00 includes shipping. Please email me to order.  You will get a color picture, pattern, and directions to complete the above goodies.

In case you didn't notice, I have made navigating my blog a little simpler.  You will notice the tabs underneath my heading picture.  Click on those to be taken to the pages containing those items. :-)

I may re-release another pattern for my prim geese, but I haven't decided if I will or not.  This is what they would look like if I do.  I even made a mallard and Canadian goose out of the pattern.


I don't know about you, but I have started thinking about my New Year's resolutions.  I am really going to try to make them easy for me to achieve.  Normally, I make ones that I really can't do and then I feel bad if I break them.  I won't tell you in today's post, but I will as the New Year approaches.

I just want to say thank you for visiting today.  I hope you are having a wonderful week.


Pin It